
By blackmountaincycles,
Filed under: Uncategorized
To get the most out of your canti brake, it’s crucial to get the straddle cable carrier (yoke) installed in the right position based on the type of brakes you are running. Simply put, you want to try to achieve a 90 degree angle between the pivot bolt/cable anchor/straddle cable. The angle formed if you drew a line from the pivot bolt to the cable anchor on the arm and along the straddle cable should be around 90 degrees. This gives you a good combination of modulation and power. It’s possible to alter this angle to get more power, giving up modulation. A rough rule of thumb is low-profile brakes require a low straddle cable carrier position, wide profile brakes require a high straddle cable carrier position. Going even lower on a low-profile brake will give you more power, but the modulation will be lower and the brake pads will need to be set closer to the rim. This position also will feel a little mushy at the lever. Most lower profile canti brakes I see have the straddle carrier set too high. This might feel good at the lever; solid feeling, you might say, but when you need to hit the brakes you won’t have the power needed to stop.
It’s easy to talk geometry and mechanical advantage because there are quantifiable formulas to determine the end result. This 6-page piece on mechanical advantage of cantilever brakes is good and easy to read. There is one thing that no one talks about when setting up cantilever brakes: cable flex and cable line. You’ve just tightened the bolt securing your straddle cable and you think you’re done. After all, the brake pads are adjusted. The straddle cable carrier is positioned just so. The lever works. The pads close and open. However, chances are, you are not done. There’s one more trick you can do to get the most out of your canti brakes. Straighten the straddle cable. If your straddle cable has any kind of curve to it between the brake arm and the carrier yoke, when you apply the brake lever, some of that lever movement is taken up in straightening the cable. By physically bending the cable over the yoke and where it’s anchored, you’ll get a straight line and all of the lever movement will go into applying brake pressure to the rim.
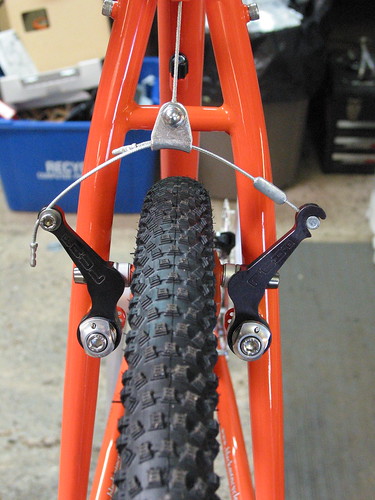
Notice the curve in the straddle cable. This is before straightening it.
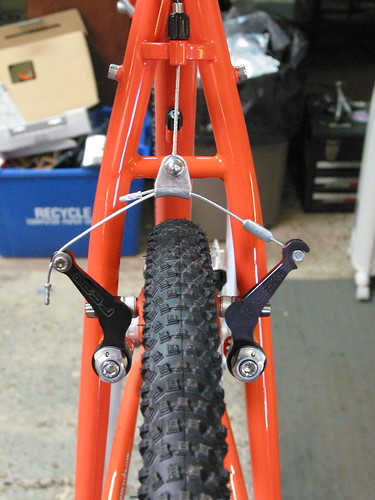
After straightening. Simply bend the straddle cable with your fingers where it comes off the yoke. Easy.
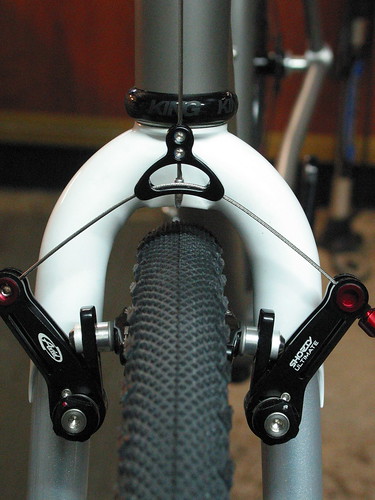
Avid Ultimate.
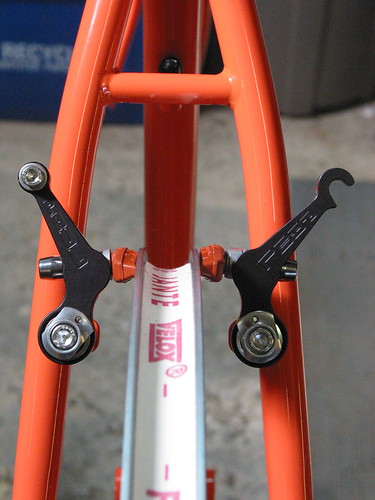
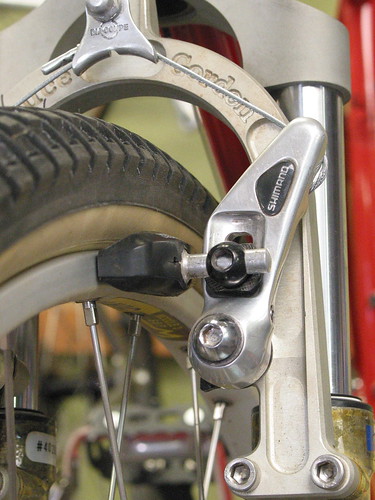
The right arm has the pad set up properly with the thick washer on the inside. The left arm has the thin washer on the inside and the arm is past the perpendicular position to the rim.
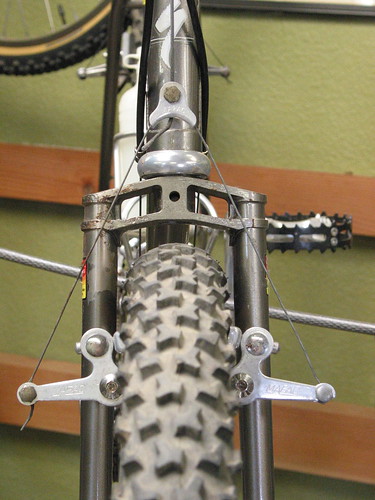
1980s Shimano cantilever, a mid-profile design (not wide like the Mafac and not narrow like the Paul Touring Canti above). This straddle carrier is bit too high, but I installed this long ago when I ran fenders on this bike. The carrier is also a wide version. I like these when used with drop bars (that this bike has) because it shortens the straddle cable and gives a more positive feel at the lever.
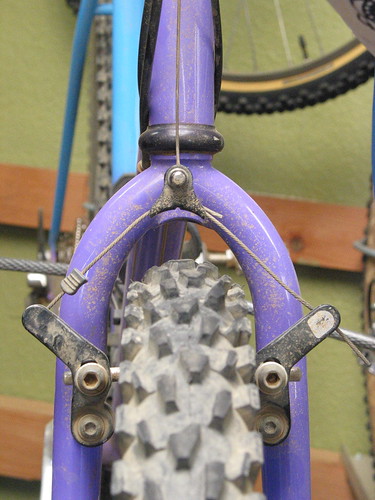
Wide style Mafac canti brake.
Low-profile Dia-Compe 996 – one of my favorite canti brakes.
Low profile Shimano. I probably would have set these up with the arms a touch wider by sliding the pad inboard a bit in the eye-bolt.
An example of a thick brake pad that can potentially rob the brake of power. Is it a coincidence that this brake arm shape, coupled with the thick pad, and that all of these brakes, at the time, were supplied with a one-piece straddle cable assembly that did not allow for proper straddle height came out in the hey-day of the mountain bike which means that the vast majority of people were simply set up with canti brakes that weren’t optimal. Could this be the impetus of cantilever disdain?
One last word
I’m not a big fan of the one-piece straddle cable carrier. On my personal bikes, I prefer to set the straddle height where I want it for optimal performance. Many cantilever brakes, today, are supplied with one-piece straddles in various lengths that can be used to get a proper straddle position. It’s just will the proper one be chosen?

(What’s playing: Loretta Lynn Women’s Prison)
I feel bad…

No wonder I still haven't met a canti I liked. Thanks, Mike!
A well-tuned brake is always better than a poorly adjusted brake. Great article. I love cantilever brakes.
nicholas
As always great tips and looking forward to adjusting my canti's this weekend
Yay canti's!
I think that canti's could make a real comeback in the hearts of cyclists if people saw them as the artisan brake caliper. Maybe someone should make a nice video about the cottage industry of properly setting up a cantilever brakeset. You know, the blood, sweat, and artistry that goes into a properly set up caliper set. Beautiful and powerful stuff.
Disclaimer: 90% of my bikes have canti brakes. I even tried putting them on my track bike.
-Gabe
Some cantilevered thoughts in random order:
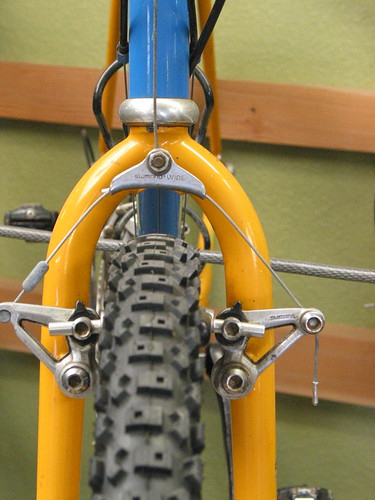
The wide straddle hanger basically allows one to get a particular (and crucial) straddle cable angle while physically having the hanger in a lower position. Think Mafacs on the rear (or front) of a small bike where a high straddle cable wouldn't be possible. IMO, the angle on that orange and blue rig is pretty close to ideal. The 90 angle needs to be looked at when the pads hit the rim, since that is when the braking takes place, not when the brakes are released.
Another critical piece to the canti puzzle is cable housing. It's got to be routed well and as short as possible. And of course lubed up. Squishy housing makes a decently set up brake feel bad.
Those thick old Shimano pads. Even to this day (probably drier now) I still like those. I hear ya on the issues they face when worn at an angle, but the remedy is just to replace them once they get all womperjawed… or file them back to flat. The firmness of these old XT pads does what you like about the thin pads. I've tried the thick soft pads like a Kool Stop and they're mushy, like you say, and seem to be much more howl-prone.
The one piece straddle carrier is nice if it's the right length because it makes the brake feel crisp. Even straightening out your straddle, as you mentioned, won't give as crisp a feel as the one piecer if done right.
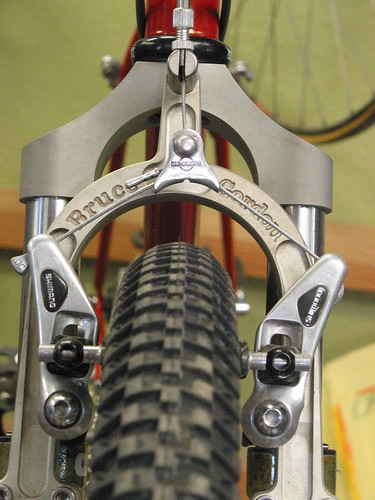
The Bruce Gordon needs a lower straddle. One easy way to check that 90 degree angle is to hold an "L" key allen at the pivot and at the cable attachment point. Remember to check when the pads are making contact with rim rather than open.
Working in a bike shop in the 80s and early 90s gave me tons of chances to experiment with the set up of these brakes. Each repair and build I'd do I'd try to perfect better than the last. Canti's can work so well if everything is right, but that was their downfall I think; you can't really mess up a V brake if you tried. Shimano tried to simplify set up with the one-piece yoke and the color-coded templates they sent out in the late 80s, but they just sat in a box in the corner of the work area. 🙂
There are two details that a lot of canti-haters overlook:
1. The rim contributes just as much as the brake pad. Some rims are just not good braking rims.
2. The position of your canti-posts determine a lot of the geometry characteristics of your brakes. If the posts are a few mm high, your brakes automatically tend towards mushy. Too low, and it's harder to get the power.
Lower pad height actually gives the brake more mechanical leverage since it's closer to the fulcrum and therefore a mushier pad.
Late to the party, but I wanted to mention that as I understand it, the standards for how wide apart the posts are has changed over time. My understand is that with older touring and other "road" bikes the posts were narrower, then with wider rims and MTBs arriving, the post spacing got moved wider, too.
Mike, can you comment on this? Have I understood correctly or is my thinking off?
Those are all great comments. Yes, those old Shimano pads with the alloy pad holder were good. The bad ones were the pads that came out in the late 80s (the ones on the Gordon). Never liked those and at that time the Aztek pads were the pad of choice.
Fred Zeppelin, there is actually a standard that is published by Shimano in graph form that does alter post height depending on rim width. But, yes, if you want to run a very wide rim (like the old Araya RM25) a slightly wider post spacing would have helped.
It does seem that the old pads with the smooth post were easier to adjust based on rim width. Modern threaded posts can't be adjusted as finely.
Fred Z. is right about the post spacing. Posts got wider when mountain bikes started becoming popular in the early 80's. The posts on touring bikes – for example my Schwinn Voyageur – are 60 to 65 mm apart. Mountain bikes are more like 80 to 85 mm, regardless of rim width. Modern brakes are all designed for the wider space. I think the Shimano standards are based on it too.
This can be a big problem if you need to replace brakes on the old bikes. The geometry gets goofy and sometimes can't be made to work well. Switching a 27" touring bike to 700c adds another layer of confusion to the whole mess.
Rich F.
Thanks for the post Mike, it's times perfectly. I have to replace the pads on my Maruishi. Is there any difference in performance between the different colors of Thinline pads?, Salmon seems like a favourite.
Saddle up, the salmon is a favorite because it seems to be more all-weather. Kool-Stop's website is lacking tech info on the different compounds, but I'm pretty sure the salmon pad is harder than the black pad. Can't go wrong with a little salmon in the diet.
A well-tuned brake is always better than a poorly adjusted brake. Great article. I love cantilever brakes.
This is so helpful! Working on a 90’s era Giant ATX mountain bike and came across the Shimano B-link cable on the Cantilevers, which I was not familiar with at all (not a mechanic, just a bicycle enthusiast). Might replace with an Avid straddle piece, but wanted to thank you for this interesting and practical article that will certainly improve my set up as well as consideration of options.
Just bought a bunch of 90s era chomoly mountain bikes ( Trek Antelope 850, Specialized Hard Rock and a Gary Fisher Al Fresco that is kind of a hybrid/mountain cross ).
They all have the fat Shimano pads on them and they are rock hard. Going to work on the Gary Fisher first and it had some nice looking Alivio cantis that are anodized a gun metal dark gray but have the Shimano blocks. Guess I will try the thin lines. These will be used for fitness cycling in the neighborhood so very little braking will be done. There’s is nowhere safe to cycle in South Florida. If anyone in my family rides enough to wear out their pads it will be my pleasure to change them.
I found a set of Deore V-brakes ( God only knows when and why I bought them ) and put them on the Specialized. They have thin pads mounted in metal holders and I have to say that they are so much better than the linears that come stock on cheaper bikes. Very powerful and progressive. My nephew still sent himself over the bars on that back last night but he was used to a BMX with brakes that hardly worked at all and doesn’t ( hopefully didn’t but now does ) know to sit over the back wheel when doing an emergency stop. I have struggled to get cheaper linears to be progressive. I am setting up a Raleigh to sell and I finally got the brakes to stop coming on too hard. The wife might not have asked for a new bike if I had been able to fix the brakes before.
As a near 60 year old who has experienced cheap steel side pull calipers on chrome rims in the wet back in the 70s, my expectations of brakes starts at a pretty low level. I have come down an alpine pass on a fully loaded tourer with old school Dia Compe cantis and don’t remember saying too many prayers.
Really enjoying working on bikes during this lock down period.
I just picked up a 1985 Claud Bulter Majestic Two tandem (originally from England) that has DiaCompe 980 cantilevers with the original pads. Needless to say, the first stop was a white knuckle gradual slow-down through a (thankfully little-used) intersection. Thought I would just swap out the old canti’s for some new Tektro V-brakes. Got them bolted on and realized that the pads were never going to hit the rim and the arms were spread way apart. Some quick measurements and the brake bosses on the fork are 55mm apart! The V-brakes are more accustomed to 80-85mm. So had to backtrack. Ended up just replacing the pads and replacing the cable and housing with new lined versions. Feels great now. And reminds me of all the miles I put on my 83 Schwinn Voyageur SP with similar cantis, and not thinking twice about the stopping power. Old but works, and well.
[…] three best resources for cantilever setup I found came from Sheldon Brown, Lennard Zinn, and Mike Varley. Everything below is basically a rewording of their articles, or verbatim quotations. Only the […]
Great article.
My first good bike was canti-powered in the 80s and I struggled to adjust those brakes, but eventually learned the basics.
Cantis are the most beautiful brake in my opinion.
They will shine on because rim brake are interesting and unique.
Thank you for sharing your expertise in this great article!
Thanks for reading!
Have you considered the danger in using a straddle cable yoke and knobby tires? If the yoke comes loose and the straddle cable slips, the brakes open up pulling the cable down to get caught on the tire knobs and then you have an emergency brake engaged. I prefer the fail safe use of a one-piece straddle cable carrier for that reason alone.
40 years of canti brakes and that’s never happened to me. If the brake cable breaks between the lever and the top of one-piece straddle, that too will get pulled into the tire causing a lock-up as well. Danger? Nope. Not with a well-maintained bike.
Hey Mike. Thanks for the super useful and informative post. I had a question about fitting cantis to an all-road/touring bike running 40mm tyres without fenders. Provided they are both set up well, would you recommend Mini Motos over Touring Cantis or is it more of a question of aesthetics?
Question of aesthetics. Both can be great brakes. Pros and cons of each, so add up your + and – to find which works best for you.