By blackmountaincycles,
Filed under: Uncategorized
I’m a junkie for tech stuff. I’m hungry to learn as much as I can about bikes and how to make them work better. I’ve been getting paid to work on bikes for a quarter century and I still know I have more that I can learn. With the internet, there is plenty of information that can be easily gleaned. Some good, some not so good. Part of being a good mechanic is knowing what bits sound reasonable and what is just not good information. And a big part of being a mechanic is being open to learning new things.
With disc brakes for road and cross on the top of a lot of news stories, I recently saw this headline “The Fall of Discs: Trick your Avid BB7 brakes” on velonews.com and thought “great, more info to learn.” Disappointment. The story read essentially like the manual on how to install the brakes. No new info there to learn. No tricks on how to get the most out of your brake. Just the simple obvious stuff. Not that that isn’t important. Sometimes the obvious gets overlooked and is just as important as the not-so obvious.
I was looking for the not-so obvious and it wasn’t there. I do already have some not-so obvious tips for getting the most out of your Avid BB7 brakes when they are used with drop bar levers.
A lot of Avid BB7 brakes are used on bikes like the Salsa Vaya and Fargo with drop bars and drop bar levers. There is a lot that is happening underneath your bar tape that can affect the performance of your brakes. Number one is the cable routing under the tape. Brake levers such as the Tektro RL-520 / Cane Creek Drop V brake levers have a very poor cable exit location out of the body. The comparable canti brake levers from Tektro/Cane Creek have a much better cable exit. The cable exit location on the v-brake levers, however, is horrible.
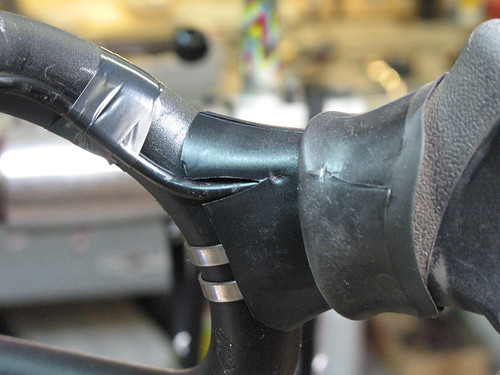
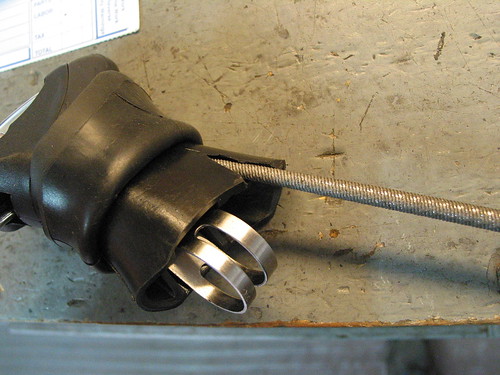
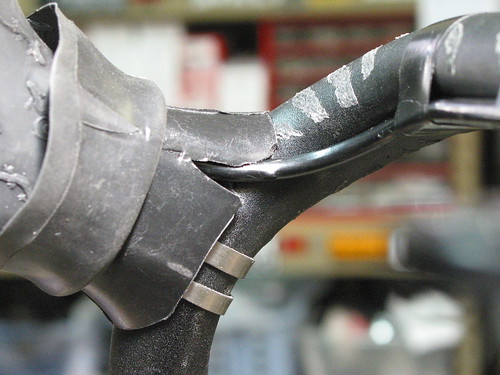
When the Tektro/Cane Creek lever is paired up with a bar such as the Salsa Woodchipper, the housing must make a fairly extreme bend up after it exits the lever body. This puts a big kink in the housing and cable and instantly creates a lot of friction after only an inch of housing past the lever. Luckily, the lever body is plastic and the corner that the housing must pass can be modified to give the housing a much more gentle bend, reducing cable friction inside the housing. To achieve this, I use a couple of round files – a larger one to knock off the corner quickly, and a smaller one to finely tune the routing to make it as smooth and rounded as possible.
What the cable routing looks like with an unmodified lever.
Filing the housing exit hole.
Finished body with a much more gentle bend in the housing.
The other method I employ to get the most out of Avid BB7 brakes with road levers is using compression-less brake housing such as Jagwires Ripcord housing. On bikes with drop bars and full-length housing, there is a lot of housing. Standard brake housing compresses and over 5 or 6 feet, that all ads up to mushy feeling at the brake lever and requires the pads to be set too close to the rotor resulting in too much noise. With compression-less housing, the pads can be set away from the rotor to minimize noise, there’s a lot less mush at the lever, and the brake feel is more like any other brake.
I don’t run compression-less all the way from lever to caliper, though. I run standard brake housing from the lever, under the bar tape to a few inches past the bar tape where I usually install in-line cable adjusters. From the in-line adjuster, I run compression-less housing the rest of the way to the caliper. Why do it this way? Because the standard housing is more flexible and has less friction inside as it makes the bends under the bar tape than the compression-less housing. Once the housing exits the bar tape, the bends in the housing should all be very large radius, smooth bends.
To further reduce cable friction, I’ve been using Shimano’s “Special Grease” inside the housing. I have a special injector filled with this grease that I use to pre-inject into the housing so when I run the cable through it all gets a nice coating. This method is less wasteful than simply coating the cable before running through the housing.
There. Now you can trick out your Avid BB7 brakes. Even though this is mainly about the Tektro/Cane Creek levers, this all applies to any other lever. Look at how the housing exits the lever and make sure the housing has no tight bends under the bar tape. It might feel okay before you tape the bars, but after taping the bars, the bar tape will force the housing into the tighter bar bends and what feels fine before taping could feel binding after the bar tape.
(What’s playing: JP Harris & The Tough Choices Return to Sender)
« Prev
BMC bottles in the wild…
BMC bottles in the wild…
Next »
What’s playing…
What’s playing…


I just installed the same parts on my bike. I'll go back and do it again using your tips. thanks
Mike, what in-line cable adjusters do you use? I went with some BB-5 brakes instead of BB-7's on a drop-bar mountain bike due to the 5's having cable adjusters at the caliper where the 7's don't. I tried Mickey adjusters but they just didn't work well with my frame cable stops.
Thanks Mike. Full-length housing and drop bars have always resulted in mushy braking for me.
Uh, using compressionless housing of any make-includeing the kevlar wrapped stuff form Jagwire, etc.-is a very bad choice; if the housing itself doesn't burst from heavy braking forces, the wire sheath will gnaw away at the cable housing ferrules, eventually pushing through.
I notice a lot of poor brake action/feel using conventional(helical-wrapped) brake cable housing can be rectified by ensuring that all cable housing ends are filed/ground perfectly flat or square. The brake cable housing is effectively a bearing; if a bearing is not square in its mounting, it will not function properly. The rear brake cable housing section for my XXL Tallboy is over 6 feet long(!), yet with proper end preparation, I have solid, slammin' brake action.
DO NOT USE COPRESSIONLESS CABLE HOUSING FOR BRAKES